
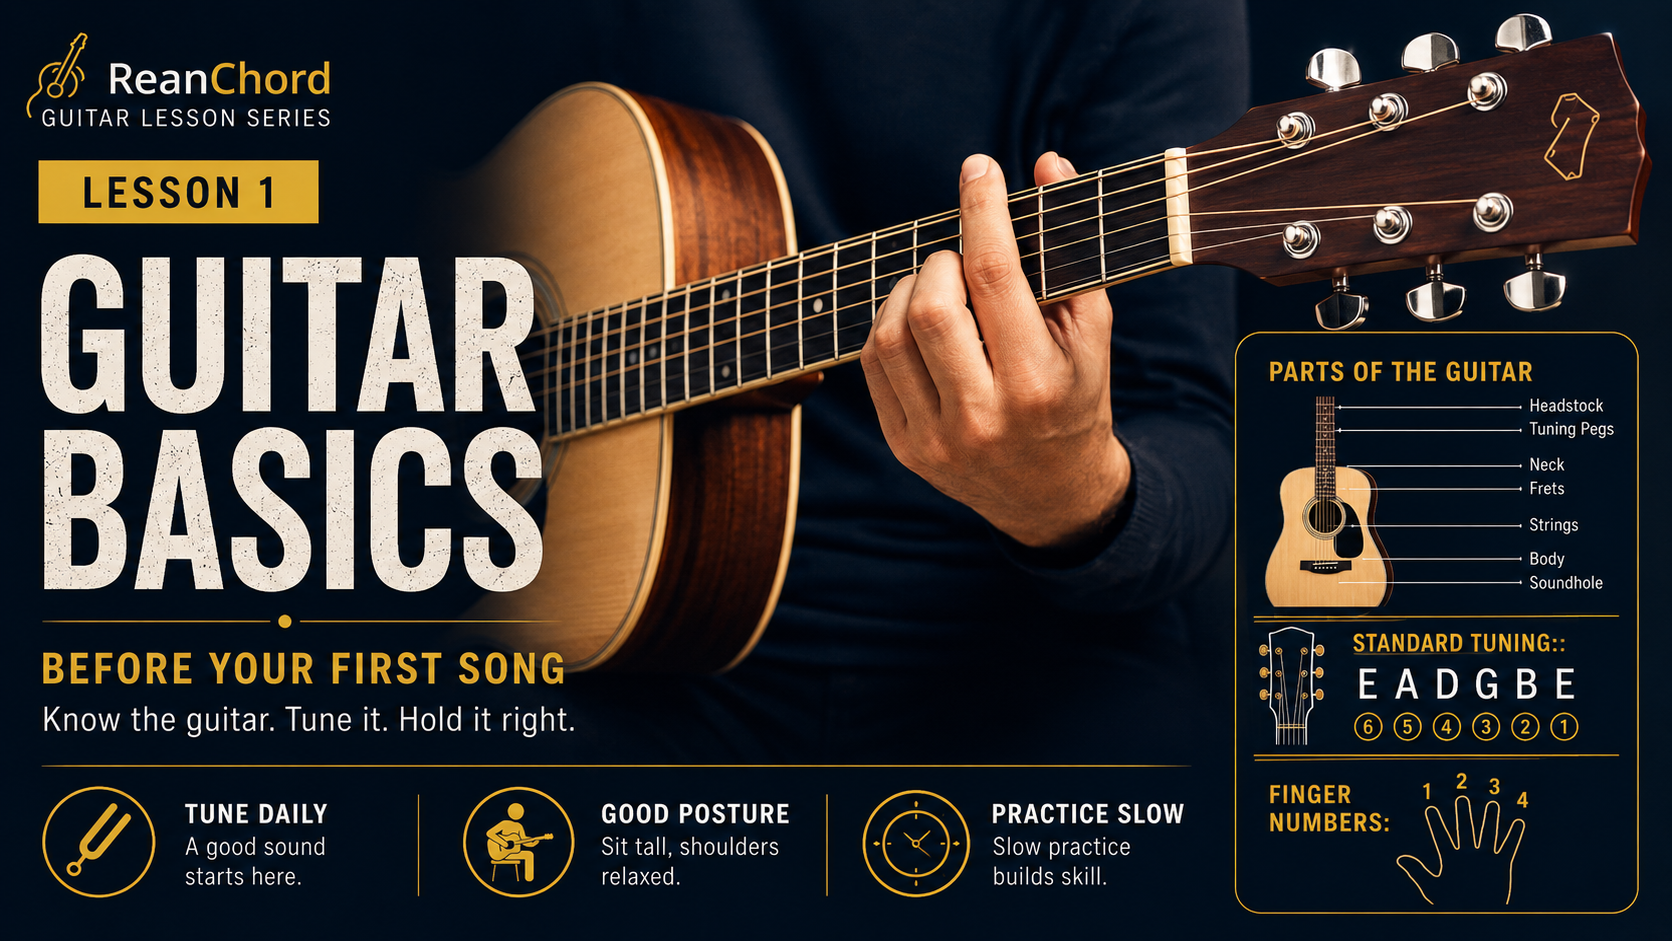
Beginner · Getting Started with the Guitar
Welcome to your first guitar lesson!
Before you begin learning songs, chord progressions, strumming patterns, or guitar solos, it is important to understand the instrument in your hands. A strong foundation will help you learn faster, avoid common mistakes, and develop good playing habits from the beginning.
In this lesson, you will learn:
- The main parts of the guitar
- The names and numbers of the six strings
- How to tune your guitar
- How to hold the guitar correctly
- How guitarists number their fingers
- How to press the strings cleanly
- How to practice effectively
- How to prepare for your first chord progression
Do not worry if everything feels unfamiliar at first. Every guitarist started by learning these same basics.
1. Parts of the Guitar
Knowing the parts of your guitar makes future lessons easier to understand. When an instructor says “place your finger behind the second fret” or “turn the tuning peg,” you should know exactly where to look.
Headstock
The headstock is located at the top end of the guitar neck. It holds the tuning pegs and often displays the guitar brand or logo.
The design of the headstock may look different depending on the guitar, but its main purpose is always the same: it supports the tuning system and anchors the strings.
Tuning Pegs
The tuning pegs, also called machine heads or tuners, are used to adjust the pitch of each string.
Turning a tuning peg changes the tension of the string:
- More tension makes the pitch higher.
- Less tension makes the pitch lower.
Turn the pegs slowly. Small movements can change the pitch more than you expect, especially on the thinner strings.
Nut
The nut is the small strip located between the headstock and the fretboard. It has six narrow slots that guide the strings into the correct positions.
The nut helps maintain proper string spacing and supports the strings when they are played open.
Neck
The neck is the long section connecting the headstock to the guitar body. Your fretting hand moves along the neck to create chords, notes, scales, and melodies.
A good hand position around the neck allows your fingers to move freely without unnecessary tension.
Fretboard
The fretboard, sometimes called the fingerboard, is the front surface of the neck. This is where you press the strings.
Most fretboards contain position markers, usually dots, around the 3rd, 5th, 7th, 9th, and 12th frets. These markers help you quickly identify your location on the neck.
Frets
The frets are the thin metal strips placed across the fretboard. The spaces between these metal strips are also commonly called frets.
When someone says “play the second fret,” press the string in the space between the first and second metal fret wires. Place your finger close behind the second fret wire, but not directly on top of it.
Each fret raises the pitch by one half step.
Body
The body is the large main section of the guitar.
On an acoustic guitar, the hollow body amplifies the vibration of the strings naturally. On an electric guitar, pickups detect the string vibrations and send the signal to an amplifier.
Soundhole
The soundhole is the round opening in the body of most acoustic guitars. It helps project the sound created inside the guitar body.
When strumming an acoustic guitar, your hand will usually move across the strings near the soundhole.
Bridge
The bridge is attached to the guitar body and holds the strings at the opposite end from the tuning pegs.
The bridge transfers string vibrations into the guitar body. On acoustic guitars, the strings are often secured with bridge pins. Electric guitars may use several different bridge designs.
2. The Six Guitar Strings
A standard guitar has six strings.
When holding the guitar in playing position, the thickest string is closest to your face, and the thinnest string is closest to the floor.
From the thickest string to the thinnest string, the open-string notes are:
–– – – –
They are numbered as follows:
| String Number | Note | Description |
|---|---|---|
| 6th string | E | Thickest and lowest-sounding string |
| 5th string | A | Second-thickest string |
| 4th string | D | Lower-middle string |
| 3rd string | G | Upper-middle string |
| 2nd string | B | Second-thinnest string |
| 1st string | E | Thinnest and highest-sounding string |
Remember that string numbering begins from the thinnest string:
- The thin high E string is the 1st string.
- The thick low E string is the 6th string.
A useful memory sentence for the notes from the 6th string to the 1st string is:
Eddie Ate Dynamite, Good Bye Eddie.
You can also create your own sentence if another phrase is easier to remember.
3. Standard Guitar Tuning
Before every practice session, tune your guitar.
Even a perfectly played chord will sound unpleasant if one or more strings are out of tune. Tuning should become a normal part of your guitar routine.
Standard tuning from the 6th string to the 1st string is:
–– – – –
What You Can Use to Tune
Beginners can tune with:
- A clip-on tuner
- A phone tuning application
- A pedal tuner
- A built-in guitar tuner
- An online tuner with microphone access
A clip-on tuner is often the easiest choice because it detects vibrations directly through the guitar.
Step-by-Step Tuning Method
- Turn on your tuner.
- Play the 6th string by itself.
- Check whether the tuner displays E.
- If the pitch is too low, slowly tighten the correct tuning peg.
- If the pitch is too high, loosen the string slightly.
- Tune from a little below the target pitch and gradually raise it until the tuner shows the correct note.
- Repeat the process for the A, D, G, B, and high E strings.
- Check all six strings again after finishing.
Changing the tension of one string may slightly affect the others, so a second tuning check is useful.
Important Tuning Safety
Never turn a tuning peg quickly or force a string far above its intended note. A string can break if it becomes too tight.
Pay close attention to the note displayed by the tuner. For example, if you are tuning the 5th string to A, make sure you are not accidentally tightening it toward a much higher note.
4. How to Hold the Guitar
Good posture makes playing more comfortable and helps both hands move efficiently.
Sitting Position
Sit on a stable chair without armrests.
Keep your back upright but relaxed. Avoid bending your shoulders forward or twisting your body to see the fretboard.
For a standard right-handed playing position:
- Rest the guitar body on your right leg.
- Hold the neck with your left hand.
- Strum or pick with your right hand.
For a left-handed playing position, reverse these directions.
The guitar should feel balanced before your fretting hand begins working. Do not use the fretting hand to hold the entire weight of the neck.
Fretting-Hand Position
Place the thumb behind the neck rather than wrapping it tightly over the top.
Keep the wrist relaxed and allow a small natural curve. Your fingers should approach the strings with their tips.
Avoid letting the palm press heavily against the back of the neck. A small space between the palm and neck gives your fingers more freedom.
Picking-Hand Position
Rest the forearm gently on the upper edge of the guitar body.
Keep the wrist loose. Whether you use a pick or your fingers, the movement should feel controlled rather than stiff.
When strumming, move naturally through the strings. Do not squeeze the pick too tightly.
5. How to Press a String Correctly
Clean notes depend on accurate finger placement.
Place your fingertip just behind the fret wire. Do not place it directly on top of the metal fret, and do not place it too far back in the middle of the fret space.
Use enough pressure to make the note clear, but do not squeeze harder than necessary.
Test Your Note
- Place one finger on a string.
- Press just behind the fret.
- Pick that string.
- Listen carefully.
A clean note should ring clearly.
If you hear a buzzing sound:
- Move your finger closer to the fret wire.
- Press with the fingertip.
- Add a little more pressure.
- Make sure another finger is not touching the string.
If the note is completely muted, check whether your finger is lying too flat.
6. Finger Numbers
Guitar chord diagrams use numbers to show which fretting-hand finger should press each note.
The finger numbers are:
- 1 = Index finger
- 2 = Middle finger
- 3 = Ring finger
- 4 = Pinky finger
The thumb is usually marked with T when it is used, although beginners should focus first on standard chord shapes without using the thumb to fret notes.
Finger numbers are not the same as string numbers. For example, an instruction may say:
Place finger 1 on the 2nd string at the 1st fret.
This means your index finger presses the B string in the first fret.
7. Understanding Your First Chord Sequence
Here is the chord collection for the chorus practice:
– – – – – – –
These symbols represent chord names:
- C = C major
- D = D major
- E = E major
- F = F major
- G = G major
- A = A major
- Dm = D minor
- Em = E minor
A letter by itself usually means a major chord. A lowercase m after the letter means a minor chord.
Major chords often sound bright, strong, or open. Minor chords often sound darker, softer, or more emotional. However, the feeling of a chord also depends on the tempo, melody, rhythm, and surrounding chords.
Do not try to master all eight chords in one session. Begin with two easier shapes, such as Em and A, and practice changing between them slowly.
The F major chord can be difficult for beginners because it is often played as a barre chord. You can begin with a simplified F chord before learning the full version.
8. Beginner Practice Routine
Consistency is more valuable than one long practice session followed by several days without playing.
Fifteen focused minutes every day can produce better results than two hours once a week.
Try this beginner routine:
Minutes 1–3: Tune the Guitar
Tune all six strings and say each string name aloud:
E, A, D, G, B, E
Minutes 4–6: Finger Warm-Up
Place fingers 1, 2, 3, and 4 on four neighboring frets. Play slowly and keep each note clean.
Do not focus on speed. Focus on control.
Minutes 7–10: Chord Practice
Choose one or two chord shapes. Build each chord carefully and play every string separately.
Listen for buzzing or muted strings.
Minutes 11–13: Chord Changes
Move slowly between two chords.
Do not strum immediately. First, place the fingers accurately. Speed will develop after the movement becomes familiar.
Minutes 14–15: Musical Practice
Strum a simple rhythm or play along with a slow metronome.
Finish the session by playing something enjoyable, even if it is only one chord.
9. Practice Tips for Faster Improvement
Practice Slowly
Slow practice allows your brain and fingers to learn the correct movement. Fast, inaccurate practice teaches mistakes.
Play slowly enough that every note sounds clean.
Keep Your Hands Relaxed
Too much tension makes chord changes slower and can cause discomfort.
Check your shoulders, wrist, thumb, and fingers regularly. Release unnecessary pressure.
Use a Metronome
A metronome helps you develop steady timing.
Begin at a slow speed, such as 50 or 60 beats per minute. Increase the tempo only after you can play accurately.
Expect Sore Fingertips
Mild fingertip soreness is normal for beginners. Your fingertips usually begin developing calluses after one or two weeks of regular practice.
Stop if you feel sharp pain, wrist pain, numbness, or joint pain. Normal fingertip tenderness is different from an injury.
Record Yourself
A phone recording can reveal timing problems, muted strings, or uneven strumming that you may not notice while playing.
Celebrate Small Progress
Your first clean note, first smooth chord change, and first complete song are all meaningful achievements.
Do not compare your first week with another guitarist’s tenth year.
10. Common Beginner Mistakes
Avoid these common habits:
- Practicing with an untuned guitar
- Pressing directly on top of the fret wire
- Holding the pick too tightly
- Flattening the fretting fingers across nearby strings
- Trying to play too fast
- Ignoring rhythm while focusing only on chord shapes
- Practicing many chords without mastering any of them
- Continuing through sharp or unusual pain
- Expecting instant results
- Skipping daily practice
The goal is not perfection in one day. The goal is steady improvement.
Lesson Checklist
Before moving to the next lesson, make sure you can:
- Identify the headstock, tuning pegs, nut, neck, fretboard, frets, body, bridge, and soundhole
- Name the six open strings as E, A, D, G, B, E
- Recognize the 1st and 6th strings
- Tune the guitar using a tuner
- Hold the guitar with relaxed posture
- Place the fretting-hand thumb behind the neck
- Press a string just behind the fret
- Identify fingers 1, 2, 3, and 4
- Explain the difference between a major and minor chord symbol
- Complete a focused 15-minute practice session
Final Encouragement
Learning guitar is a physical and musical skill. Your fingers need time to become stronger, your ears need time to recognize clean sounds, and your brain needs repetition to remember chord shapes.
At first, even a simple chord may feel uncomfortable. That does not mean you lack talent. It only means the movement is new.
Tune carefully, sit comfortably, practice slowly, and return to the guitar every day. Small improvements will begin to connect, and soon you will be ready to play your first complete song.
Next Lesson
How to Read Guitar Chord Charts
In the next lesson, you will learn how vertical and horizontal lines represent strings and frets, how finger numbers are displayed, what open circles and X symbols mean, and how to build your first chords from a diagram.
— Written by the ReanChord team.